In my previous post you'll see a pick of the asparagus dish. One of the preparations included an egg yolk. I asked the server how it was prepared and she went to the kitchen to ask. I told the table that it was mostly likely sous vide preparation. The server came back and got into some mumble jumble about 147º and 149º - the temps at which yolks and whites cook respectively. I asked again, but helping her understand that I was talking about the actual technique. She retreated to the kitchen again. The revised answer - Immersion circulator.
I said, "You mean, sous vide?" She repeated the circulator.
This was interesting because I've heard this answer on cooking shows, from other peers and even at the pastry forum from another classmate. So am I wrong? The circulator is simply the machine that circulates the water in your water bath. The process is called sous vide? Right? I sous vide without a circulator (for lack of funds) and get the same results. What's up with this? If I'm wrong I really want to know. If not, why is the circulator being used to describe the process? Its not about the water moving, its about heating under water. Thoughts?
Thursday, July 22, 2010
Tuesday, July 20, 2010
Restaurant Review: Bloom, Grand Rapids, MI
Now that I'm doing my own restaurant, writing reviews of other restaurants is very difficult. I don't think I have much interest in reviewing restaurants that I don't like, yet am comfortable offering critique, just as I would like to receive objective critique of my work. This shift really started after I reviewed a local restaurant - 1Zero6 on eGullet a couple of years ago. The review was highly critical, but ultimately said it was a good restaurant worth visiting. Those critiques are hard to hear when its about yourself and something that you put your whole heart into. So its with that overlay that I offer this review of Bloom in Grand Rapids, Michigan.
Following the World Pastry Forums we took a week and a half of vacation to get out and see family and friends. Near the end of the trip we wound our way into Grand Rapids to see the godkids and their parents, and even though we were cash strapped, I pleaded for a stop at Bloom. Bloom seems to be my distant relative - locally sourced, slow foods, prepared with unique flavor combinations and presented artistically. I thought it misfortunate that their logo bears a resemblance to BP, but it was kind of funny to me.

The inside had a nice color palate and a space that wasn't overdone or pretentious. The tables are a gorgeous wild grass - the server couldn't remember the name, but I'll be looking into them for a future purchase. The chairs (similar to mine) were uncomfortable for a longer dining experience.

We were the only table seated for our early dinner at 6:30. By 7:30 a few more tables strolled in, but was definitely not going to be a busy night for them. Chef started by sending out an amuse of seasonal melon and other items that I've forgotten. It was the combination of sweet melon and pickled vegetables. An appropriate amuse, although not memorable.

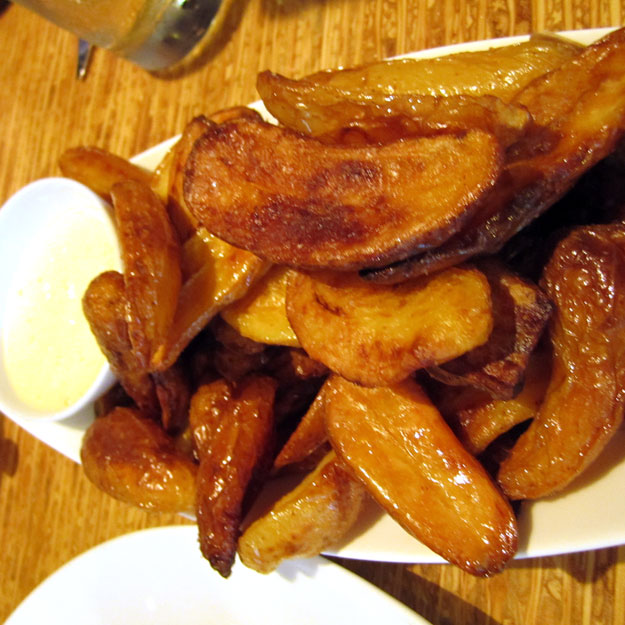
Now, here's my warning. Your entrees (if they're like ours) will be huge and appetizers, salads, etc are going to be too much. I think this type of restaurant begs for the customer to eat a variety of things and the entrees should be scaled down by about 40%. Not knowing this at the time, and nursing some fun cocktails, we started with roasted fingerlings and truffle mayonnaise. Light on the truffle and far more potatoes than we could eat, this was a nice start to the meal.

Next we had foccacia, housemade preserves and ricotta. I enjoyed this, Tyler didn't. Again, portions should have been much smaller, but I enjoyed the ricotta and preserve combination and will be borrowing from it for my new menu.

For starters we had the carrot soup with sweet pea panna cotta and pepper tuile. This was the first slip of the night. The soup was poured tableside, but the carrots were so thick that the server had to vigorously shake the pitcher to get the carrots into the bowl. That aside, the taste was enjoyable and fresh.

Tyler had the Symphony of Asparagus. For a slow foods restaurant this should have left their menu by now as asparagus is no longer in season in the US. The most notable of the four dishes was the cous cous salad which popped with flavor. Again, too large of portions for Tyler.

When the entrees arrived, we were all despondent knowing we would barely dent these monsterously sized dishes. First was the seared whitefish with multiple carrot preparations. Gaff number two - the bacon. WTH!? A more creative presentation is really needed. I'm not sure if the bacon is locally made, but it was not interesting and didn't deserve top billing in the plating. I would use Niman Ranch any day if there wasn't a suitable local alternative. Just one fillet would have been plenty.

I had the lamb neck. Huge. Monsterous. Gigantic. But really, really tasty and well prepared. The farro was perfectly prepared and the sauce fantastic. I didn't really get the cornichons, but Tyler enjoyed them just fine.

Tyler had the hanger steak which he enjoyed...but only enjoyed a couple of pieces before he gave up. Very well prepared.

Our fourth entree was the pork belly. This is what I wanted to get just because I'm on a pork belly kick, but I talked our least decisive friend into it. Well done - perfectly soft, moist and crisp at the same time.

None of us wanted dessert, but I had to because...well, because I'm me. Here again the tableside pouring was disastrous. My guess is that the chef hasn't seen the end result of his pours. Again the server violently shook the rhubarb soup onto the rhubarb bavarian and sorbet. Flavors were good but not notable, but after all of that food we may have not been able to taste any more.

Terrible review, right? No. I really enjoyed Bloom, and would order differently next time. I think two people should order one line of dishes and share them and then the sizes will be appropriate. If for some reason this was an off night, don't blame me, just know that my food alone could have fed more than two people. The flavors were all really quite nice. The presentation was unique and for the most part spot on. The gaffs that I've noted wouldn't have negatively impacted my experience of the meal, so really they are just peer critiques. I would be surprised if there were a better restaurant in GR.
Following the World Pastry Forums we took a week and a half of vacation to get out and see family and friends. Near the end of the trip we wound our way into Grand Rapids to see the godkids and their parents, and even though we were cash strapped, I pleaded for a stop at Bloom. Bloom seems to be my distant relative - locally sourced, slow foods, prepared with unique flavor combinations and presented artistically. I thought it misfortunate that their logo bears a resemblance to BP, but it was kind of funny to me.

The inside had a nice color palate and a space that wasn't overdone or pretentious. The tables are a gorgeous wild grass - the server couldn't remember the name, but I'll be looking into them for a future purchase. The chairs (similar to mine) were uncomfortable for a longer dining experience.

We were the only table seated for our early dinner at 6:30. By 7:30 a few more tables strolled in, but was definitely not going to be a busy night for them. Chef started by sending out an amuse of seasonal melon and other items that I've forgotten. It was the combination of sweet melon and pickled vegetables. An appropriate amuse, although not memorable.

Now, here's my warning. Your entrees (if they're like ours) will be huge and appetizers, salads, etc are going to be too much. I think this type of restaurant begs for the customer to eat a variety of things and the entrees should be scaled down by about 40%. Not knowing this at the time, and nursing some fun cocktails, we started with roasted fingerlings and truffle mayonnaise. Light on the truffle and far more potatoes than we could eat, this was a nice start to the meal.
Next we had foccacia, housemade preserves and ricotta. I enjoyed this, Tyler didn't. Again, portions should have been much smaller, but I enjoyed the ricotta and preserve combination and will be borrowing from it for my new menu.

For starters we had the carrot soup with sweet pea panna cotta and pepper tuile. This was the first slip of the night. The soup was poured tableside, but the carrots were so thick that the server had to vigorously shake the pitcher to get the carrots into the bowl. That aside, the taste was enjoyable and fresh.

Tyler had the Symphony of Asparagus. For a slow foods restaurant this should have left their menu by now as asparagus is no longer in season in the US. The most notable of the four dishes was the cous cous salad which popped with flavor. Again, too large of portions for Tyler.

When the entrees arrived, we were all despondent knowing we would barely dent these monsterously sized dishes. First was the seared whitefish with multiple carrot preparations. Gaff number two - the bacon. WTH!? A more creative presentation is really needed. I'm not sure if the bacon is locally made, but it was not interesting and didn't deserve top billing in the plating. I would use Niman Ranch any day if there wasn't a suitable local alternative. Just one fillet would have been plenty.

I had the lamb neck. Huge. Monsterous. Gigantic. But really, really tasty and well prepared. The farro was perfectly prepared and the sauce fantastic. I didn't really get the cornichons, but Tyler enjoyed them just fine.

Tyler had the hanger steak which he enjoyed...but only enjoyed a couple of pieces before he gave up. Very well prepared.

Our fourth entree was the pork belly. This is what I wanted to get just because I'm on a pork belly kick, but I talked our least decisive friend into it. Well done - perfectly soft, moist and crisp at the same time.

None of us wanted dessert, but I had to because...well, because I'm me. Here again the tableside pouring was disastrous. My guess is that the chef hasn't seen the end result of his pours. Again the server violently shook the rhubarb soup onto the rhubarb bavarian and sorbet. Flavors were good but not notable, but after all of that food we may have not been able to taste any more.

Terrible review, right? No. I really enjoyed Bloom, and would order differently next time. I think two people should order one line of dishes and share them and then the sizes will be appropriate. If for some reason this was an off night, don't blame me, just know that my food alone could have fed more than two people. The flavors were all really quite nice. The presentation was unique and for the most part spot on. The gaffs that I've noted wouldn't have negatively impacted my experience of the meal, so really they are just peer critiques. I would be surprised if there were a better restaurant in GR.
Monday, July 19, 2010
Ginger Cookies
Giant Gingerbread Cookies (credit to Desserts by the Yard by Sherry Yard):
* 2 1/4 C all purpose flour
* 2 t baking soda
* 1/4 t salt
* 3/4 C (1 1/2 sticks) unsalted butter, softened
* 3/4 C packed light brown sugar
* 1/4 C sugar, plus 1/3 C for dusting
* 1 1/4 t ground ginger
* 1/2 t ground cinnamon
* Pinch of ground cloves (optional)
* 1 large egg
* 1/4 C blackstrap molasses
* 1/2 C crystallized ginger, chopped (I omitted these, since I didn’t have any)
Place a rack in the middle of the oven and preheat to 350F. Line two baking sheets with parchment paper.
Sift together the flour, baking soda, and salt and set aside.
In the bowl of a stand mixer fitted with the paddle attachment, or in a large bowl with a hand mixer, cream together the butter, brown sugar, the 1/4 C sugar, the ginger, cinnamon and cloves for 1 minute at medium speed. stop the machine, scrape down the sides of the bowl and the paddle/beaters, and add the egg and molasses. Blend at medium speed for 1 minute, then scrape down the bowl and paddle. On low speed, add the sifted dry ingreidnets and then the crystallized ginger. Mix for 30 seconds.
Place the 1/3 C sugar in a bowl. Lightly flour your hands. divide the dough into 16 pieces and roll into balls about 2 inches in diameter. Roll in the sugar and place on the prepared baking sheets about 2 inches apart. (I made mine smaller and ended up with about 3 dozen).
Bake, one sheet at a time, for 12 minutes. Rotate the sheet from front to back and bake for another 5 to 7 minutes, until the cookies are light brown around the edges.* Remove from the oven and transfer to a rack to cool.
Sunday, July 18, 2010
Here's my latest contribution to Bauscher's Deep Plate blog using their Tafelstern platter: Pumkin seed oil cake with lemon curd.


Wednesday, July 7, 2010
World Pastry Forum: Final Thoughts
Back when I was the Pastry host at eGullet, each year in June people would post comments about how they wanted to go to the forum but were afraid that their skills weren't adequate. Having now been through the process I can answer definitively. If you want to do the demo classes, any skill level will do just fine. The more experience you have the more you will get out of it, but everyone is so friendly if you don't understand basics, then just ask and someone will help. A good example of this - because I have cases of disposable pastry bags, I've never, that's right, never made a paper piping bag. We needed them in the sculpture class, I asked, and now I know.

For the hands-on classes, a bit more consideration is necessary. The registration form called for "professionals only." We had some that weren't professionals and they did fine. However, in many instances we worked in small groups. When we did the finishing work on our sculpture I had to let Sarah do the bulk of the work since I had never done that. I held my own in most areas, but was aware that I was slowing us down - that is unacceptable in a professional kitchen. So gauge your abilities and ask yourself "if you were in a small group, would you hinder your group or help them?" Your desire to learn should not impact your partner's $2000 investment in their own growth. If your partner is having to teach you, which they will be willing to do, then you are hurting their learning opportunities.
So, that said, anyone with some decent skills, even if only home skills, should consider the forum workshops.
On a more political note. I will not attend this workshop again if it is in Phoenix, and Arizona still has their immigration law. I don't get political in this blog, but think about how heavily dependent the food services industry is on the Hispanic community. To hold a conference in a state where a large portion of our employees would be at risk or uncomfortable is ridiculous.
Thanks to our fantastic instructors and I hope you all enjoyed the report.

Monday, July 5, 2010
World Pastry Forum: My Chocolate Showpiece
Here's the base that I carved:

And some leaves formed from molds, flowers and airbrushing by Sarah

Flower detail.


and remember...all chocolate.

And some leaves formed from molds, flowers and airbrushing by Sarah

Flower detail.


and remember...all chocolate.
World Pastry Forum Days 4-6: Chocolate Showpiece
In the showpiece workshop led by Stephane Treand, MOF, we just dove in and started creating. He offered us one core technique which was how to form your base sculpture. Start by having a theme or vision for where you want the sculpture to end up. Next sketch out the figure, and once satisfied, draw the figure on paper in the final size. Lay a second paper over the top - preferably a waxed butchers paper and pour a bit of tempered chocolate along the lines in the sketch. Remove the sketch paper so you can see it and press cut strips of poster board into the chocolate to hold the shape of your form.

Once the chocolate sets - which will be just minutes, then pour tempered chocolate to the depth that you want your final form.

This needs to rest preferably overnight. I was working with Sarah Kosikowski, the Executive Pastry Chef at Trump Tower in Chicago. She and I turned out to be a great team because we brought complementary skill sets. We busted out a bunch of molded garnish, purposefully making more than we would use because we wanted to have plenty of options when it came time for assembly. I started carving away at our chocolate figure while Sarah made oodles of flower petals. My goal was to do as my old high school art teachers used to say - its not just a matter of what you add on, but what you take away, and so both Sarah and I were very aware of our negative spaces and details, as well as our relief sculpting.
But let me show some of Chef's creations (for the record, in the time it took us to make our one showpiece, Chef created eight or ten...I lost track). Here Chef inset a small DVD player into a chocolate frame decorated with metal bolts (all chocolate of course).

This concrete technique is a 50/50 mix of granulated sugar and tempered chocolate - its crucial that the chocolate be in temper or the seizing will be unusable. Chef then attached some chocolate bars dusted with bronze luster.

I'm going to have to ask more about this technique to figure out the coloring...maybe a classmate knows.

Here Chef created an oversized ring that he industrialized with bolts...again, all chocolate.

and the final piece with the sugar diamond mounted on top.

Here's granite that was done by two of Chef's volunteer assistants (Masumi and Jessie) - They started with a medium size bowl of white tempered chocolate, added a small amount of chef rubber blue sapphire for the lightest color- poured out 1/3 to crystalize. Added more blue sapphire for the next color - poured out 1/3 to crystalize, added more blue and red for final purple color. Once all of the chocolate was fully crystallized they pulsed each color and some dark chocolate separately. Melted cocoa butter, added white diamond color and mixed by hand. Next day the block was evened out on a warm marble and buffed with a dry cloth. They used a foam core mold made with duct tape. I like this pic because you see the chocolate granite in front of the real granite. In the end, mix the chopped pieces with cocoa butter and pour into your mold. Rap the air bubbles out and let set.

A few more of Chef's showpieces:

Tyler's favorite...look at the detail - even the Guess logo embossed in the heel.

I'll post my sculpture in the next post.
Saturday, July 3, 2010
World Pastry Forum Day 3: Chocolate & Confections Finishing Work
After we had made the hundreds and probably thousands of chocolates and confections it was time to coat them. Fortunately we had an enrobing machine. Cost - $47,000.

This machine tempers, enrobes, blows the top of the bon bons, vibrates the excess off, then sets the bon bons off on a conveyor belt to be boxed by a bunch of chefs.

We sent through the liqueur filled sugar shells.

and got these...

We hand cut the caramels and wrapped them by hand.

Some of the bon bons had nuts placed on top.

Some were coated, nuts set on top, the chocolate holding the nuts before running them through for a second coating.

Some were garnished with saffron threads as they came out of the machine.

Some had a fork tong touched, pulled up slightly then drawn back toward the fork handle.

Others had a texture sheet layed on top with a bit of pressure to ensure that the texture took

Others had a grid pressed onto the top

Nice finish...

and ultimately we set up the buffet station with all of our creations...

all of which were devoured within an hour.


World Pastry Forum Day 2: Feuilletés Pralinés
Before I show all of the finishing work we had a demo of Feuilletés Pralinés candies. For anyone ambitious enough to try these, here is the recipe:
Duja
330 g Hazelnuts, toasted
250 g Confectioners sugar
70 g Hazlenut paste
Process these ingredients well, place in bowl and set under a heat lamp to keep them warm, mixing from time to time. The bowl should stay at 50-60ºC.
Sugar
1000 g Cane sugar cubes
330 g Mineral water
150 Glucose DE38
2 g Tartaric acid
8 g Cinnamon extract
2 Vanilla beans
Food coloring of your choice
Combine sugar, water and glucose in large saucepan and heat to 159ºC. Add the acid and cinnamon.
Pour sugar onto silpat with the vanilla beans.

Add your first food coloring remembering to go from lightest to darkest. Swirl in the pan to mix.

When the sugar is firm enough to handle, but still very warm, start stretching and folding.

Do this with all of the colors you wish to use. Ultimately roll out the white sugar in a light box keeping sugar warm but solid at all times.

Spread the duma in the sugar, quickly seal the edges well, trim excess.

Next take logs of the colored sugar and line up.

Lay on the filled section and again stretch and fold a number of times being careful not to damage the skin and cause leaking.

And through some candy magic and a cool confectionary toy...

quickly laying your logs on the toy cutting quickly...

You'll have these gorgeous candies.


Subscribe to:
Posts (Atom)


